Filing a Water Damage Insurance Claim: A Step-by-Step Guide for Cape Coral Homeowners
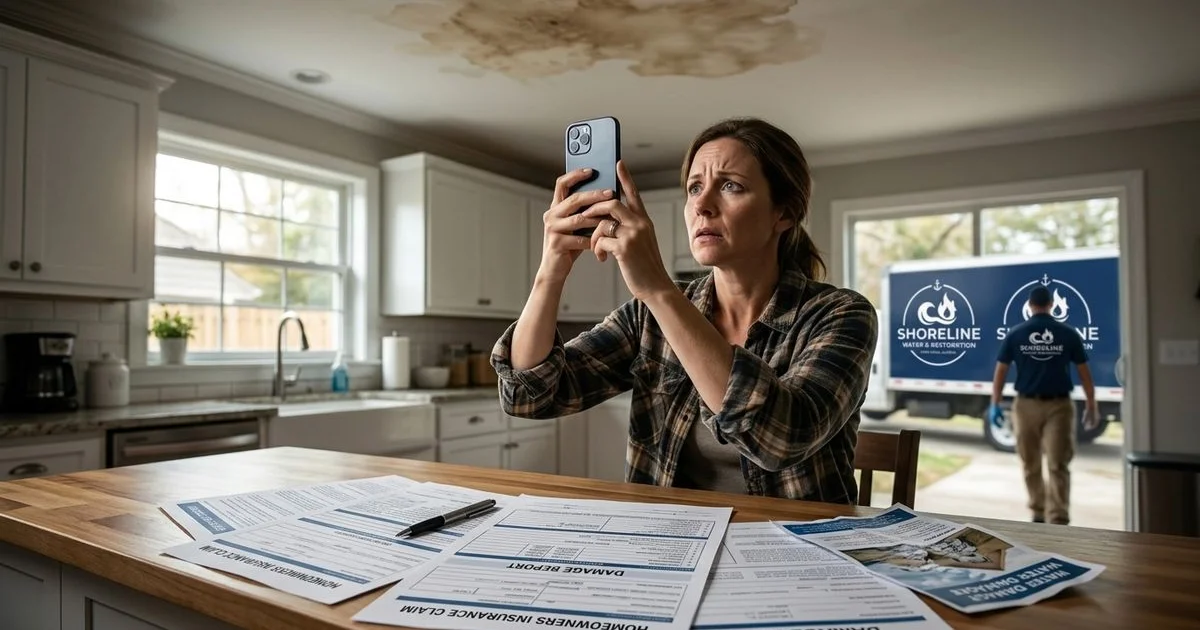
We know that seeing water spread across your living room floor triggers instant panic.
The first thought is usually about the cleanup, but the financial reality of property damage hits just as fast.
Recent 2026 data shows the average Florida water damage claim exceeds $12,000. Our team has guided hundreds of locals through this exact scenario to maximize their payouts. Filing a Water Damage Insurance Claim: A Step-by-Step Guide for Cape Coral Homeowners requires understanding specific Florida regulations.
Florida law recently shortened the reporting window, making fast action critical. We will break down the exact process and walk through the best workarounds for common insurer pushback. Let’s look at the data, see what it actually tells us, and explore a few practical ways to respond.
Step 1: Document Before You Touch Anything
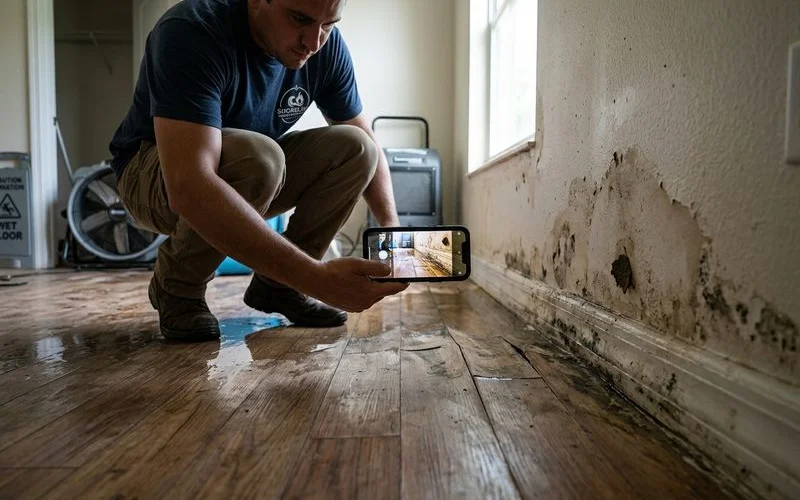
Grabbing a phone to record the scene is the best first step you can take. Our restoration technicians always tell clients to capture the damage before reaching for a towel. The moment you discover a burst pipe or roof leak, photographic evidence becomes your strongest asset.
Insurance companies often look for any reason to classify a loss as gradual wear and tear instead of a sudden accident. Our favorite trick is using a ruler or a common coin to show the exact depth of standing water. A simple cell phone video showing the active leak can prevent a complete claim denial later.
Make sure to photograph the following key details to build a bulletproof case:
- The source of water (burst pipe, failed appliance, roof leak)
- Standing water on floors (include reference objects like a shoe to show depth)
- Water marks on walls (photograph from far enough away to show the full extent)
- Damaged furniture, electronics, and personal property
- Labels and model numbers on damaged appliances
- Any visible mold growth (if the damage has been ongoing)
Taking more photos than you think you need is a smart strategy. Our experts recommend shooting wide angles first, then moving in for close-ups of specific ruined items. Document every room that has been affected, including closets, cabinets, and bathrooms.
This documentation is your primary evidence. Our experience shows that the insurance adjuster will not see the original conditions if you begin cleanup before they arrive. Taking action immediately helps secure your financial recovery.
Step 2: Mitigate Further Damage
Your insurance policy includes a duty to mitigate, which is a requirement that you take reasonable steps to prevent additional damage. Our team advises clients that this does not mean you need to complete the restoration yourself. You simply need to stop the situation from getting worse.
The Environmental Protection Agency states that mold can begin growing on damp materials within 24 to 48 hours. Our crews suggest taking these specific emergency actions right away:
- Shut off the water source if possible
- Remove standing water from hard surfaces with towels and mops
- Move undamaged items away from the wet area
- Place aluminum foil under furniture legs on wet carpet
- Open cabinet and closet doors for air circulation
Keep all receipts for any emergency purchases like shop vacuum rentals, fans, towels, and cleaning supplies. These mitigation expenses are fully reimbursable under standard homeowners policies. Our clients often save hundreds of dollars just by submitting these hardware store receipts.
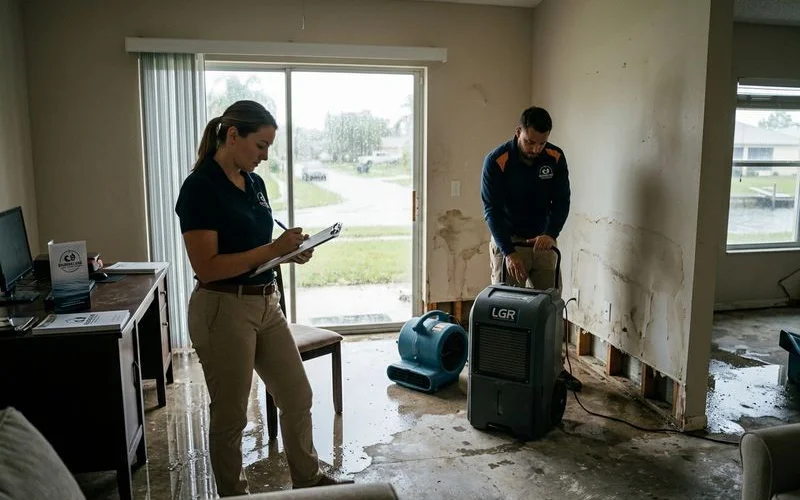
Step 3: Call Your Restoration Company
Calling a professional restoration company before calling your insurance provider gives you a massive advantage. The 2026 data shows that roughly 99 percent of buildings in Cape Coral face a very high risk of flooding. Our technicians begin emergency mitigation immediately, preventing water from destroying your subfloors.
Professional mitigation typically costs between $3 and $7.50 per square foot. This fast response stops damage from escalating into a massive reconstruction project. Our teams use professional equipment like moisture meters and thermal imaging cameras to strengthen your claim.
- They prepare a detailed Xactimate estimate that aligns with strict insurance industry standards.
- Having an expert present during the adjuster’s inspection ensures all damage is accurately identified.
Our restoration specialists at Shoreline bill the insurance directly to save you from a massive administrative headache. Managing the claims process as part of the service makes your life much easier.
Step 4: Report the Claim to Your Insurance Company
Florida law recently implemented strict new deadlines that you absolutely must follow. Our claims managers remind homeowners that Florida Statute 627.70132 now strictly limits the reporting window to just one year from the date of loss. Waiting too long is a common mistake.
The average Florida water damage claim is not reported for 47 days, which creates massive exposure for a denial. Our advice is to call your insurance company’s claims line and report the incident within 24 hours. Have the following information ready when you make the call:
- Policy number
- Date and time the damage was discovered
- Source of water (if known)
- Brief description of the damage
- Whether anyone was injured
- Contact information for your restoration company
Note your claim number and the name of the person you spoke with. Our staff always tells clients to ask for the name and contact information of the adjuster assigned to the case. Under Florida law, your insurer must acknowledge the claim within 14 days and pay or deny it within 60 days. Delays in reporting can raise questions about the timeline and complicate your payout.
Step 5: Work with Your Restoration Company on the Estimate
Our estimators prepare a detailed, line-by-line assessment using Xactimate software. This program is the industry standard for pricing out repairs and remediation. The detailed estimate includes several crucial phases of the recovery project.
Our typical Xactimate reports outline the following costs:
- Water extraction and mitigation costs
- Structural drying equipment and monitoring
- Material demolition and disposal
- Antimicrobial treatment
- Reconstruction costs (drywall, flooring, painting, trim)
- Contents cleaning or replacement
Using this specific software ensures that pricing aligns with what the Florida insurance market considers fair and customary. This standardized approach reduces disputes and speeds up the entire claims process.
Step 6: The Adjuster Inspection
Our field supervisors highly recommend having your restoration contractor present when the insurance company sends their adjuster. The adjuster is there to inspect the damage and protect the insurance company’s bottom line. Walking through the property together ensures everyone sees the exact same issues.
During the visit, you should execute these specific strategies:
- Our experts use thermal imaging to point out hidden moisture the adjuster might otherwise miss.
- Show the adjuster your photo and video documentation of the original conditions.
- Explain any areas where you have already begun emergency mitigation work.
Our team encourages you to ask the adjuster direct questions about your coverage limits and timeline. The adjuster will prepare their own damage assessment and cost estimate. Compare their numbers directly to your restoration company’s Xactimate estimate.
A supplemental claim will be filed by our billing department if the adjuster’s scope misses items or uses lower pricing.
Step 7: Review the Insurance Response
After the inspection, your insurance provider will issue a formal coverage determination. Reviewing this document carefully protects you from accepting an unfair settlement. Our case managers look for five specific details when reviewing these responses:
| Insurance Response Element | What You Should Verify |
|---|---|
| Scope of Work | Does the document cover every single item that was damaged? |
| Pricing Accuracy | Does the payout align with current Xactimate fair market rates? |
| Policy Exclusions | Did they deny coverage for items that should be included? |
| Depreciation Rules | Did they apply ACV (Actual Cash Value) or RCV (Replacement Cost Value)? |
| Deductible Application | Was the correct standard deductible applied to the final total? |
RCV policies pay the held-back depreciation money after repairs are completed. Catching an error in this paperwork can increase your final payout by thousands of dollars.
Step 8: File Supplements as Needed
Our reconstruction crews frequently discover additional damage hidden behind walls or under tile floors. Finding structural issues or mold growth during the demolition phase is incredibly common. Florida law gives homeowners up to 18 months to file a supplemental claim for these newly discovered issues.
The supplemental process involves three quick steps:
- Our documentation team immediately photographs the hidden damage and takes fresh moisture readings.
- A supplemental Xactimate estimate is then prepared for the additional work.
- The new request is submitted to the insurance company for immediate approval.
Our project managers continue working on the originally approved scope while the supplement is processed. Supplements are a completely normal part of the process and should not halt your overall progress.
Common Claim Mistakes to Avoid
Fixing a major property loss is stressful enough without making expensive administrative errors. Our seasoned professionals see the same few mistakes cost homeowners thousands of dollars every year. Here are the most critical pitfalls to avoid during your recovery:
- Waiting too long to report: Delays raise red flags and may violate the strict 1-year policy requirement.
- Cleaning up before documenting: Once you remove evidence of damage, it cannot be recreated.
- Throwing away damaged items: The adjuster needs to see ruined materials to approve the replacement cost.
- Accepting the first offer blindly: Initial assessments almost always underestimate the true scope of work.
- Failing to file supplements: If additional damage is found, you should never absorb the cost yourself.
- Hiring a contractor who skips Xactimate: Non-standard pricing creates immediate disputes with major insurers.
Protect your property by following these guidelines exactly. You can secure a fair settlement by staying organized and acting quickly.
Our restoration specialists are always ready to help you handle the heavy lifting. Understanding the rules for Filing a Water Damage Insurance Claim: A Step-by-Step Guide for Cape Coral Homeowners gives you a massive advantage. Call (239) 268-8546 for immediate water damage restoration with full insurance claims management in Cape Coral.

Paul Breehne
Regional Franchise Operator
Paul Breehne is a Regional Franchise Operator for Shoreline Water & Restoration in Southwest Florida, bringing over a decade of hands-on restoration experience to the Cape Coral market.
Need Emergency Restoration?
Shoreline Water & Restoration provides 60-minute emergency response in Cape Coral.
Call (239) 268-8546